 Pin it
 My first Art Deco cheese board happened by accident when I was rearranging my kitchen one rainy afternoon, studying a vintage architecture book spread on my counter. The geometric patterns caught my eye, and I thought, why not try that with cheese? What started as playful experimentation turned into something genuinely striking—and the moment my guests' faces lit up when they walked in, I knew I'd stumbled onto something special.
I made this for a small dinner party where my friend kept talking about feeling uninspired by her usual entertaining routine. She arrived early to help, and watching her face as the arches came together—moving from skepticism to genuine excitement—reminded me that presentation is sometimes the most generous thing you can offer, even if the ingredients are simple.
Ingredients
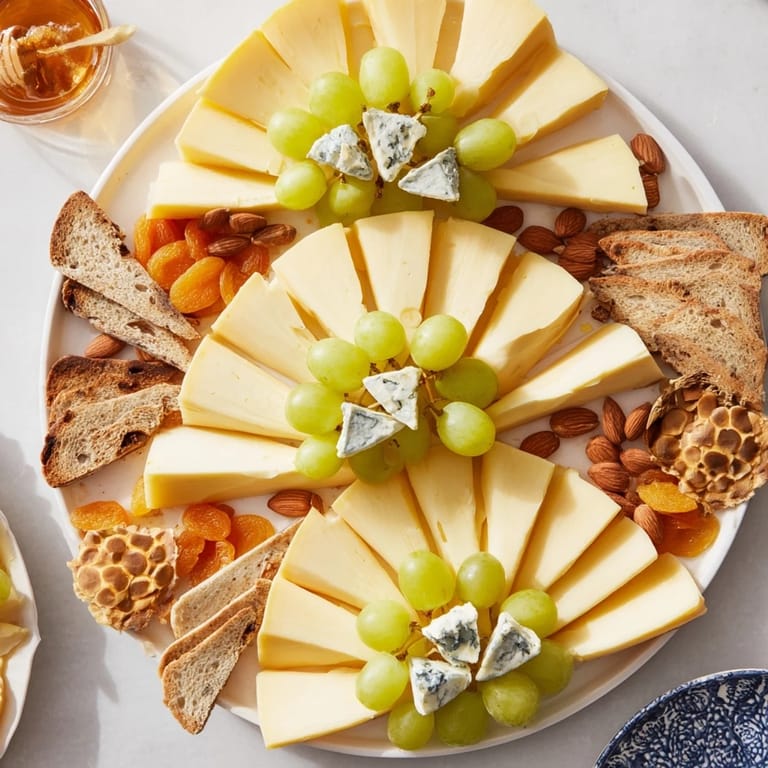
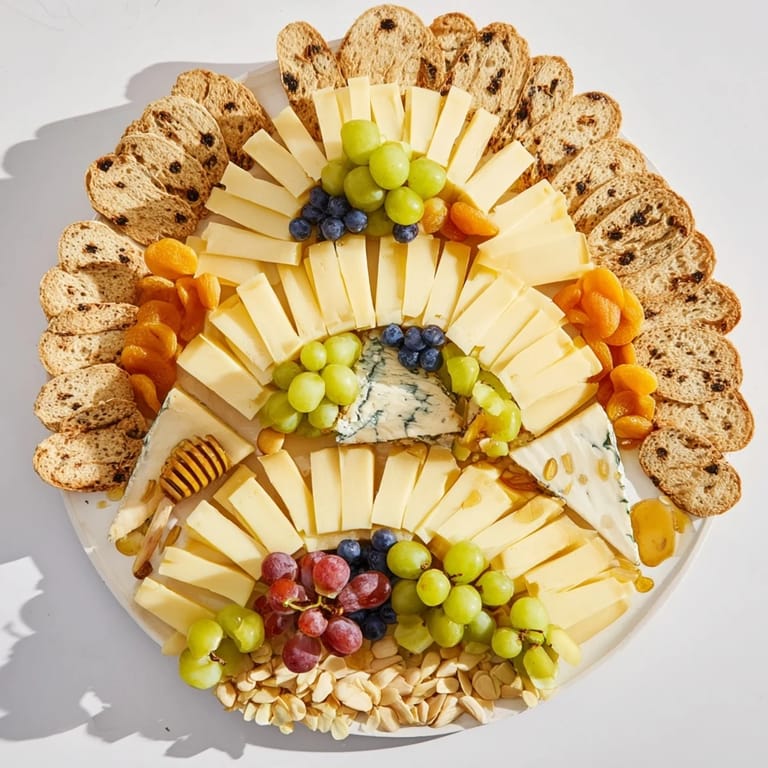
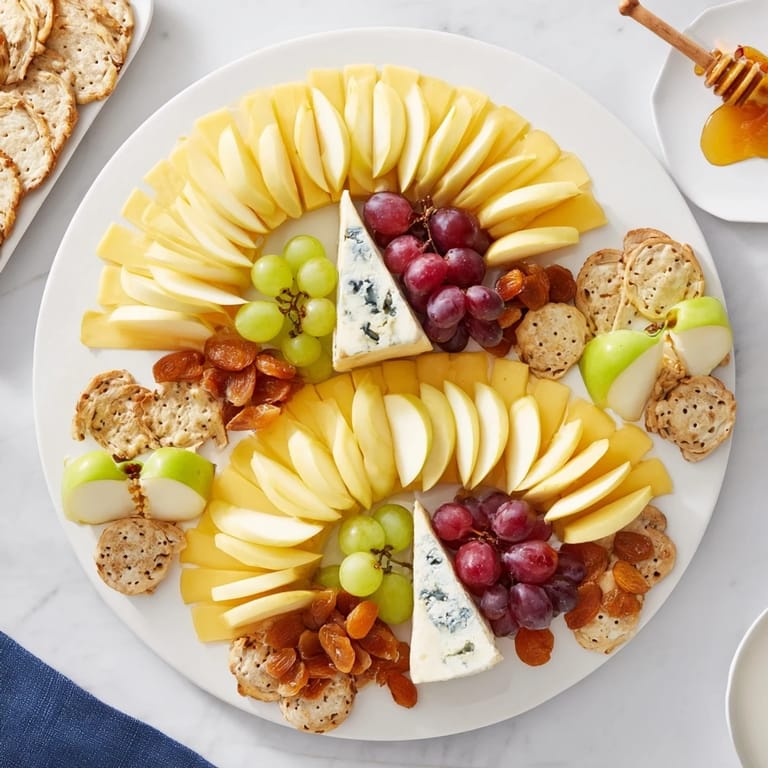
- Aged cheddar, thinly sliced: The sharpness cuts through the richness and holds its structure beautifully when overlapped, creating clean, geometric lines that actually stay put.
- Gruyère, thinly sliced: This one's got just enough nuttiness to make people pause mid-bite, and it's less crumbly than some hard cheeses, which means your fans won't fall apart.
- Manchego, thinly sliced: I love how this one catches the light differently—it adds visual interest and a slightly floral edge that surprises people.
- Creamy brie, wedged: The soft base grounds your architecture and gives you that buttery moment people actually crave.
- Blue cheese, small triangles: These pointed pieces are doing the heavy lifting compositionally, mimicking those sharp Art Deco peaks, so don't skip them even if blue cheese isn't everyone's thing.
- Seedless green and red grapes: They're your color contrast and your breath of fresh air between all that richness—pick ones that feel firm, not soft.
- Pear and apple, thinly sliced: The acidity keeps everything feeling bright, and the thin slices mean they actually fit aesthetically into your design.
- Roasted almonds: These add crunch and anchor the composition visually, plus they're less expected than plain nuts.
- Dried apricots, halved: They bridge sweet and savory perfectly and their warm color brings out the golden tones in the cheeses.
- Honeycomb or honey: A small drizzle near the brie creates a moment of luxury and helps it glisten under light.
- Baguette slices and assorted crackers: Keep these along the edges so the board feels generous without cluttering your carefully composed arches.
Tired of Takeout? 🥡
Get 10 meals you can make faster than delivery arrives. Seriously.
One email. No spam. Unsubscribe anytime.
Instructions
- Set up your stage:
- Find your largest platter or board—you need real breathing room here for the geometry to read clearly. I use a wood board because it makes the pale cheeses pop, but marble or slate works beautifully too if that's what you have.
- Build your first arch:
- Start with your aged cheddar, overlapping each slice just slightly at an angle to create a fan that curves upward. The key is overlap consistency—too much and it bunches, too little and it doesn't hold together visually.
- Echo with Gruyère and Manchego:
- Create two more arches beside the first, each one using the next cheese so you get three distinct colors reading as one unified structure. Step back frequently—the perspective changes as you work closer.
- Ground your arches:
- Tuck brie wedges at the base of each arch like architectural supports, letting them peek out just enough to read as intentional.
- Crown with blue cheese:
- Place blue cheese triangles at the apex of each arch, pointing slightly upward to echo those 1920s skyscraper silhouettes everyone recognizes.
- Fill with life:
- Nestle clusters of grapes and your sliced fruit into the spaces between arches, treating them like they're filling negative space in a painting.
- Final touches:
- Scatter almonds and apricots artistically—less is more here, as these are accents, not filler. Drizzle honey near the brie and arrange your bread and crackers along the perimeter so everything stays accessible without disrupting your design.
- Rest and serve:
- You can cover this loosely with plastic wrap and chill for up to an hour, which actually lets the flavors settle together. Serve it straight from the board so everyone can admire it before diving in.
 Pin it
 There's something about watching people's hands hover over the board, trying to decide where to start, that reminds you food is theater too. This platter became the reason they stayed longer, asked for the recipe, and told me weeks later they'd tried to recreate it.
Mastering the Cheese Slice
The quality of your slices determines whether this board reads as intentional architecture or just cheese thrown on a plate. A wire slicer glides through aged cheeses cleanly, giving you thin, uniform slices that actually overlap neatly instead of crumbling. If you're slicing by hand with a knife, use a gentle sawing motion and let the blade do the work—pressing down hard is where everything falls apart.
Playing with Cheese Substitutions
The three hard cheeses create the visual backbone, but they're not sacred. If you can't find Manchego, a young Comté or aged Gouda works just as well—you're really just looking for three cheeses with different colors and complementary flavors. Brie is the one I wouldn't swap because it's the only one soft enough to sink slightly into place, and the visual contrast of soft against hard is essential. Blue cheese is flexible too—Roquefort, Stilton, or even a milder gorgonzola work if someone at your table is blue-cheese-averse.
Building Your Platter with Precision
The secret to this board is thinking less about food and more about composition. Imagine you're dividing the platter into thirds, with each arch occupying its own space so they read as three distinct structures rather than one blob of cheese. The negative space is as important as what you're placing, which sounds pretentious until you actually do it and see how much it matters. Once you've placed your three arches, everything else is about breaking up colors and textures—warm apricots, bright fruit, neutral almonds—so no single element dominates.
- Work at eye level or slightly above so you can judge how things actually read from across a table.
- Chill everything slightly before building so soft cheese holds its shape and fruit slices stay crisp.
- If something isn't sitting right, move it—there's no commitment here until people arrive.
 Pin it
 This platter works because it proves that good entertaining isn't about complexity—it's about paying attention. Your guests will taste the care in every slice.
Common Questions
- → How do I achieve the symmetrical cheese fans?
Use thinly sliced cheeses and slightly overlap each slice in a tiered fan shape to mimic the angular elegance of Art Deco arches.
- → Can I substitute cheeses in this arrangement?
Yes, you can swap cheeses like Comté, Emmental, or aged Gouda based on your preference while maintaining similar textures and flavors.
- → What is the best way to serve the platter?
Arrange all elements on a large board and serve immediately or chilled for up to an hour to keep the fresh ingredients crisp.
- → Are there options for dietary restrictions?
For vegan adaptations, choose plant-based cheeses and omit honey, while gluten-free crackers can replace traditional ones.
- → What beverages pair well with this platter?
A crisp Champagne or a dry Riesling complements the flavors and enhances the sophisticated Art Deco vibe.